|
Order Processing Order Entry |
|
Order Processing Order Entry |
Order Entry is the menu option that enables the entry of orders into the EZZ system. This is the beginning of the business cycle for the EZZ system.
NOTE: When order entry is completed and the operator enters F4=End, the order goes into the system and retrieves all the information necessary for the completion and administration of the order entered. This is called data flow. If any of the information pertaining to the order changes, the order will need to be maintained to include the new information in the order's data flow. As an example, if the price on an order changes and the change is loaded into Inventory Item Maintenance on the IFM menu, that particular line item will need to be deleted from the order and then reentered. This will cause the order to go back into the system and retrieve the new information to correctly administer the order information.
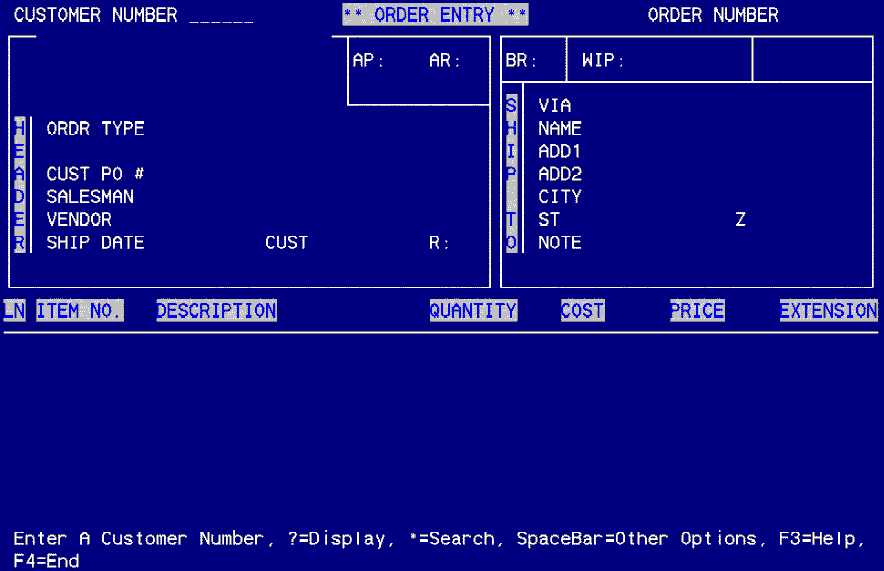
When Order Entry is selected from the OP1 menu, the system will display the order entry screen. Entry of accurate information is required as the order is useless unless the correct information is entered. There are three basic sections to Order Entry. These are Header, Ship To, and Item Detail. When entering an order, the system will prompt the operator through each of the three sections automatically. If changes need to be made in Order Entry for any of the three sections, the operator will need to wait until the item detail section is complete. After item detail is completed, the Order Processing Options window will display. From the options window, select the option that will allow changes to be made to the appropriate section, such as, F1=Header Information or F2=Ship To Information. F3=Item Detail is used to change or modify any information pertaining to the line items on the order.
Entering an Order
Enter a Customer Number. A customer number is required for all orders. A customer number can be fully entered, if the number is known. If not known, a search can be initiated that will give the correct customer number. By entering a "?" in the customer number field, a window will display with a list of all customer numbers set up in the system. If a partial customer number is known, enter the partial number and press enter. The same window will appear except the list will be only those customer numbers that begin with the partial characters entered. If the customer is a new customer, enter the customer number in the customer number field. The system will prompt Customer Number ABC123 Not On File. Create? (Y/N). To enter the new customer number, select "Y" and the Customer Master File Maintenance screen will display. Enter the customer's information and the system will then return you to the Order Entry screen. Enter "*" to search the customer number by alpha sort, zip code, ASI or Impact number, salesman number or account number.
Other options given on the enter customer number prompt are the ?=Display, =Search, and Spacebar =Other Options. The "?" and "*" have been discussed. Spacebar=Other Options allows the attachment of other orders to this primary order. This is called Attaching an Order/Multi-Vendor Orders. This option will be discussed later in this section.
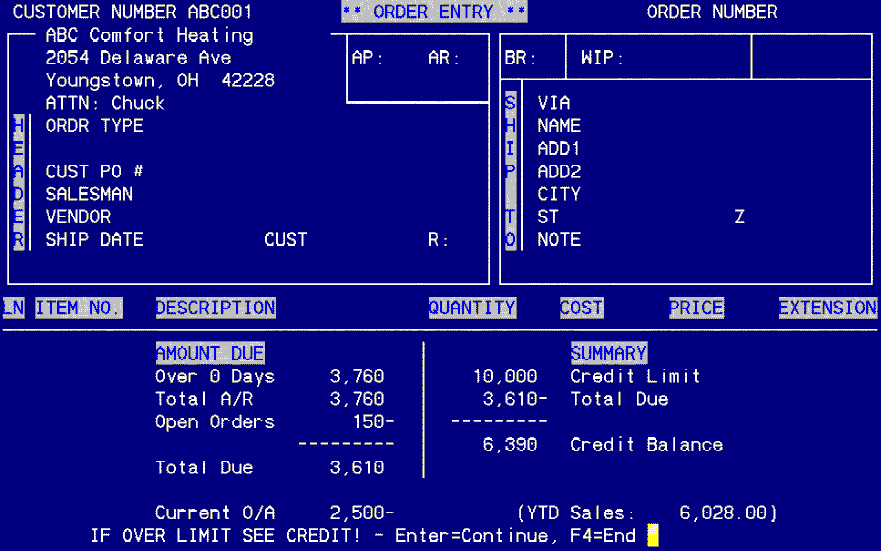
By using the credit codes on the Customer Master File Maintenance More screen on the CFM menu, the system will display the current A/R situation for the customer entered. The display will show the amount of the current A/R, the total of open orders in the system, the total O/A in the system, the credit limit and the available credit limit (Credit limit less the total due). If the customer is over the credit limit assigned, the system will prompt **Customer is Over Credit Limit**. It is imperative that the order entry process stop at this time to check with accounting to see if the order can be entered. The system WILL allow the entry of an order when the customer is over the credit limit.
Header
The header of an order includes the order type code, the customer PO number, salesman, vendor, and ship dates, both vendor and customer. Below is a brief description of the order type codes used in the system. Also listed is a brief description of the fields included in the header.
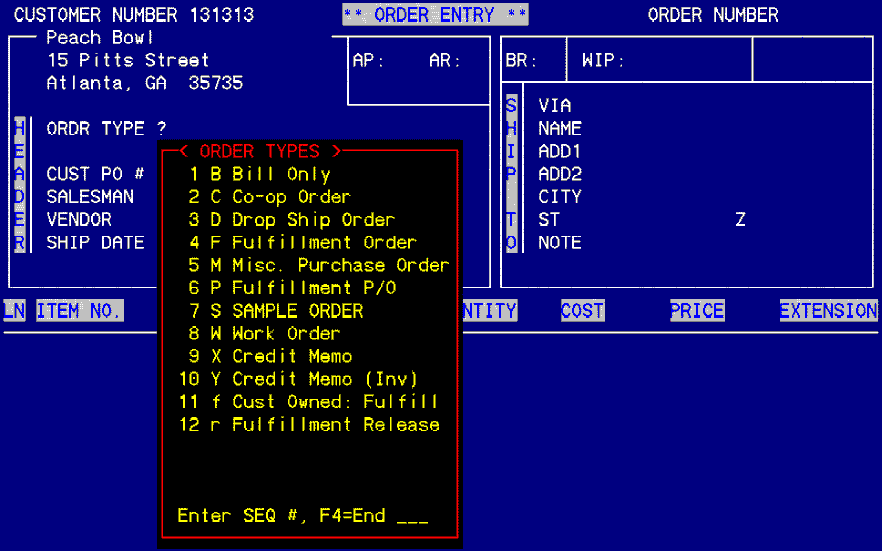
Order Type Codes. Order type codes are codes that tell the system how to handle a particular order from shipping/receiving to commissions to A/R and/or A/P. Enter a "?" in the order type field to display all of the order type codes available in the system. Some of these order types were supplied with the software. Other order type codes can be set up in the system to handle special orders that are used by the company. When the window displaying the order type codes is displayed on the screen, select the order type needed by entering the sequence number shown to the left of the order type code. The order type will be imported into the order type field. Order type codes are set up on the SEO menu under Order Type Code Maintenance.
B=Bill Only. The Bill Only is used to billing miscellaneous charges, freight, sales tax, and other non-inventory items to the customer.
D=Drop Ship. The Drop Ship is a standard order type used for orders where the merchandise is shipped directly from the vendor to the customer.
M=Miscellaneous Purchase Order. This is a purchasing PO used for non-inventory items from vendors. These may include office supplies and equipment, and non-customer specific goods and services. The Misc PO may also be used for enhancements to items sold, such as embroidery, screen printing, etc., when the M order is attached to either P or D orders. All purchasing orders in the system are prefixed with a "P".
S=Sample Order. The Sample order is used to purchase samples from vendors. The order is designated with the prefix of "S".
W=Work Order. The Work Order is a standard order used for in-house job tickets. This order type code does not update sales, A/R, A/P, commissions, etc.
X=Credit Memo. The Credit Memo enables the operator to enter negative quantities when a credit memo is needed. The prefix for Credit Memos is "X". Refer to Credit Memo procedures for more information.
C=Co-op Order. The Co-op Order is used as a program order when using drop shipments. The Co-op Order is merely a drop ship that can be tracked for sales reports and usage reports.
F&P Orders. F=Fulfillment Orders and P=Purchase Orders are discussed under the Fulfillment section of this help file.
Customer PO. Enter the customer's PO number in this field. This field MUST have a PO number if the customer master file more screen is set that a PO number is required on field 11. If a customer PO number is required, billing will be halted for this order until the PO number is entered. Order lookup can use the PO number as a mode of searching for an order.
Salesman Number. The salesman number tells the system how and to whom the commissions for this order are to be calculated and posted. The salesman number field defaults to the salesman set up on the customer master file. If a different salesman is attached to this order, this field can be overridden. For split commissions and commission overrides, see the section entitled Order Processing Options.
Vendor Number. Enter the vendor number from which the merchandise is to be purchased. The search possibilities are the same for the vendor number as for the customer number field. Enter a "?" for a complete list, enter a partial for a list of vendors beginning with the partial, or "*" to search by alpha sort, zip code, phone number, ASI or Impact number, or account number.
Ship Date. There are two ship date fields on an order. The first ship date is the date the shipment is required from the vendor. This ship date prints on the purchase order. The second ship date, labeled CUST, is the required ship date to the customer. On multi-vendor orders, the customer ship date is entered on the primary order. This is the date that prints on the customer acknowledgement. Either date can be left bank, although the CUST ship date will default to whatever date is entered into the vendor ship date.
R=Required Ship Date Message Code. This field accepts a code that states what the shipping requirements are to the customer. The requirement may be must have by, or drop dead date, or even not before date. An order with a required ship date places an asterisk (*) next to the customer ship date to denote that there is a requirement in reference to the ship date on that order. To leave this field blank, press enter to pass by.
Order Types
| B | Bill Only: is used for billing goods, miscellaneous charges, or freight only to your customer where no PO is required. |
| D | Drop Ship: is a standard order type. It is used when goods are purchased from a supplier and are drop shipped to your customer. |
| M | Miscellaneous Purchase Order: is used to generate a PO only between you and a vendor. It may be a purchase of supplies, equipment, or non-customer specific goods and services. Purchase order numbers are prefixed with a "P" before the order number (eg: P10001). |
| S | Sample Order: is used to purchase samples from a vendor. It is indicated as a sample order by prefixing the order number with an "S" (eg: S01214). |
| W | Work Order: is a standard order type. It generates an order to be used in- house for an in-house job ticket. This order type code does not update sales, A/R, purchases, A/P, commissions, etc. |
| X | Credit Memo: is a non -standard order type. This order type enables the operator to enter negative quantities when a credit memo needs issued. Refer to the credit memo procedures for more information. |
| C | Co-op Order: is a program order type used for co-op dropships. |
| F&P | Fulfillment Order & Purchase Order: are inventory order types used to purchase inventory or bill out inventory. See the separate section on Fulfillments for more information. |
SHIP TO
The Ship To section of order entry includes the branch code, ship via code, and the customer ship to address.
Branch Code. The branch code defaults to the default branch code set up on the customer master file more screen, field 18. If the branch code can be overridden, if needed.
Via. The Via code is the Ship Via code. This is the mode of transportation to be used to transport the merchandise to the customer. Enter "?" to display all available ship via codes in the system. Ship Via codes are set up on the SEO menu under Ship Via Code Maintenance.
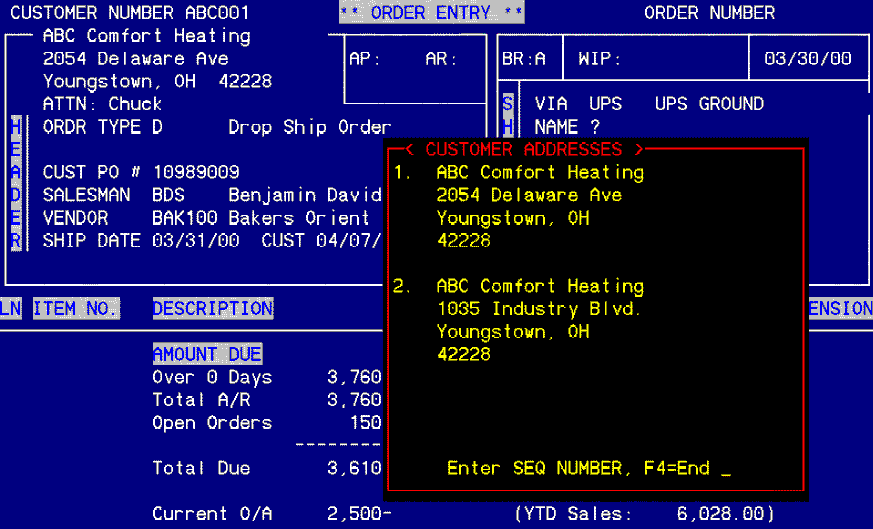
Name. Enter the ship to address for the customer on the order. The ship to address can be accessed in different ways as there may be different ship to addresses for the customer depending on the merchandise shipped. The system prompts Enter Ship To Name, C=Customer, A=Alternate, H=House, P=Contacts, ?=Display, @=Lookup. The customer ship to name and address can be hand typed. The system defaults to C=Customer. Press enter and the name and address set up on the customer master file as the ship to address will import into this section. If an alternate address is needed, select A=Alternate. This will import the Shipping Address from the customer master file set up. If the shipment is to come to the company, enter H=House. This will import the address entered in Branch/Location Setup on the SET menu, under Office Address. To ship to a customer contact, select P=Contacts. This will display a window showing all of the contacts for this customer. Select the contact needed by using the arrow up or down keys to highlight the contact and press enter when highlighted. To select from the available addresses, enter "?". A window will display with the Mailing and the Shipping Address. Select the sequence number to the left of the address needed and the address will import into the section. To select a different address in the system, select "@=Lookup". This will allow the operator to select an address from anywhere in the system including vendor, customer, salesman, or prospect.
Note. This field is for use if there should be someone at the customer that this shipment should be attention to.
After entering past the Note field, the system will prompt Enter D=Delete This Order, Enter=Continue. If the order is to the wrong everybody, vendor, customer, ship to, etc., the operator can delete the order and reenter. At this point the order is not a booked order, only entered. If the order is correct, select Enter=Continue. At this time, an order number will be assigned to this order and now it is a booked order. If F4=End is selected after the ship to section and before item detail is entered, the line item detail will need to be entered using Order Maintenance on the OP1 menu.
Item Detail
Item Detail is the section used to load the items ordered onto the order. The line items include the item number and description, quantity ordered, unit cost and price and the extension of the price. The line items, for non-inventory orders will need to be typed in. As will be seen on inventory orders in the Fulfillment section, by entering the item number, the description, cost and price will automatically be imported. The only other field to be entered would be the quantity.
Note: To enter a line on an order with no quantity, enter a "/" in the item number field. This is called a comment line. Comment lines can be used to tell the customer that they have ordered 12 Red, 12 Blue, and 12 White hats when 36 of the same hat are ordered. This counts as a line on the order but will have not cost or price and therefore no extension.
Internal X-Costs
Internal X-Costs are used to enter costs not associated with the Cost of Goods on an order, but are to be included in the commission calculation for a salesman and the gross profit on an order.
X-costs do not print on the vendor PO.
EXAMPLE 1:
For a special school safety program, Specialty Advertising Co. purchases many miscellaneous items such as imprinted bags, stickers, pencils, cups, flyers, etc. When the goods arrive, each school bag will need to be filled with the items and flyers. Specialty Advertising Co. hires the secretary's son to help assemble the kits to be ready to ship. He is paid $2.50 a kit to assemble. This is already included in the customer price but needs to be reflected as an extra cost on the order. This extra cost can be added as a line item. Press enter past the item number field to the description field. Type Assembly as the description. The quantity was 150 kits at 2.50X cost and zero price. Line items with an X behind the cost do not print on the vendor's PO. However, you do not want your customer to see the assembly on the acknowledgement or the invoice. This item can be excluded by selecting F3=Item Detail from the Order Processing Options window. From the prompt, select E=Edit Inv/Ack Detail. A window will appear that will allow the exclusion of line items from the acknowledgement or the invoice. NOTE: Only line items with a zero price can be excluded from the acknowledgement or the invoice.
EXAMPLE 2:
An order was to be shipped yesterday but, because the order sat on someone's desk for an extra couple of days, the order out to the vendor was delayed. The customer ship date is a required ship date. The company decides to have the vendor FedEx Overnight the shipment rather than use UPS Ground. The extra cost of the overnight delivery will cost extra on the order, but should not be charged to the customer, as it was an operational problem, not the customer's. The FedEx charge can be added to the order as a line item with an X-cost and zero price. The price of the FedEx will be handled when the FedEx bill comes in through Account Payable. The X-cost will change the commission and gross profit calculation. This line item should also be excluded from the customer acknowledgement and invoice.
Attaching an Order/Multi-Vendor Orders
A multi-vendor order is an order that requires multiple purchase orders to multiple vendors all on the same order, hence the name, multi-vendor orders. For example, a customer orders hats, shirts, mugs, pencils and pens. For the most part, the hats and shirts are no problem from one vendor. But, how many vendors sell all of these items. In the EZZ system, a primary order can have attachments to different vendors.
Attaching an Order
On the OP1 menu under Order Entry, the first prompt has an option Spacebar=Other Options.
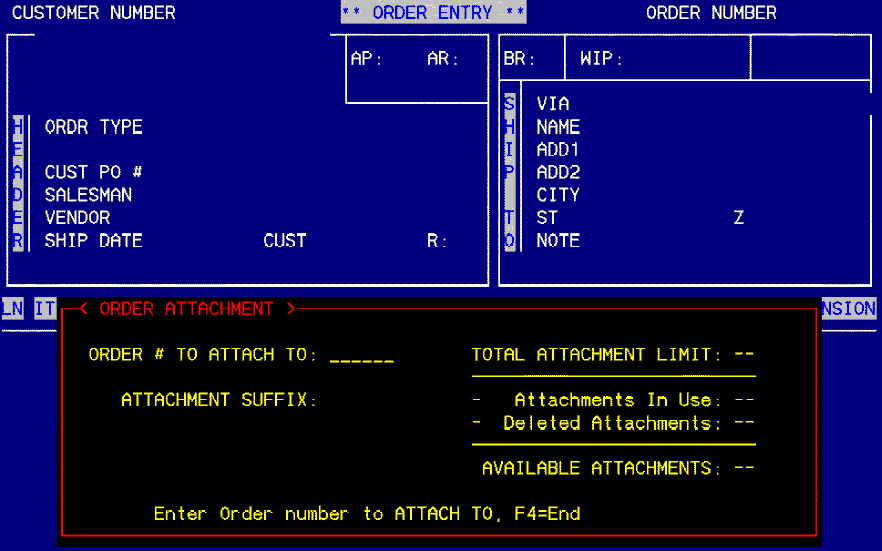
Press the spacebar and the prompt displayed reads Enter A=Attach Order, F4=End. Enter an "A" and an order attachment window displays. Inside the window, the prompt reads Enter Order Number to Attach To. Enter the primary order number. If the attachment is entered immediately following the primary order entry, a prompt under the first will read Last Order Entered. The primary order number will display in this field. If the attachment is later, this prompt will not show. When the order number to attach the secondary orders is entered, the suffix for the attachment will be assigned by the system. On the right side of the window is a counter that will keep track of all of the attachments entered on the primary order. NOTE: A primary order can have a maximum if 52 attached orders. To accept the primary order, select F5 from the prompt. Press Enter=Continue. The system will ask again if this is the right primary order. If it is, answer "Y". The attached order can now be entered as any other order would be entered.
Order Processing Options
F1=Header. Enables changes to be made to the Header, the left portion of the order entry screen.
F2=Ship To. Enables changes to be made to the Ship To, the right portion of the order entry screen.
F3=Item Detail. Enables changes to be made to the line items on the order. The prompt that displays reads Enter line # (X-Y), D=Delete Line, A=Add Line, E=Edit Ack/Inv Detail, P=Post Commissions, O=Other, F4=End.
D=Delete. To delete a line item or comment line, enter "D". The system will then ask which line to delete and will ask for verification of the deletion.
A=Add Line. To add a line item or comment line, enter "A". The system will send the cursor to the item number field. Enter the line item or comment line as needed.
E=Edit Ack/Inv Detail. To edit existing line items, enter "E". This will display a window showing the line items. The prompt in the window will read Enter=Edit, F5=Include, F6=Exclude, F4=End. To exclude an item from an acknowledgement, as discussed in X-Costs, select F6. An asterisk will disappear from the left side of the line item highlighted. To attach a discount to a line item, highlight the item and press enter. Press enter until the cursor is in the DISC% column. Enter the discount allowed on this item. Entering a discount to an item will display a "D" beside the price on the order.
P=Post Commissions. This allows the changing of the commissionable cost and price for the line item. This is especially important when entering a Credit Memo against a commissionable order. Enter "P" and enter the commissionable cost to be used for commission calculation.
O=Other. To enter a royalty code to a line item, enter "O" to display the royalty code window. Royalty codes can be set on the item level in Inventory Item Maintenance on the IFM menu, the customer level in Customer Master File Maintenance on the CFM menu, or at Order Entry using this prompt.
F5=Factory Instructions. Using this option, allows for pre-canned instructions to the factory to be entered. For more information on Factory Instructions, refer to the SEO menu under Miscellaneous Factory Instructions.
F6=Factory Notes. This option is used to enter factory instructions not included in the Factory Instructions under F5.
F7=Order Note Pad. This option displays a notepad for any other notes concerning this order.
F8=Imprint Instr. Imprinting instructions may be entered using this option. If a imprint is used over and over again, a library template for imprint instructions can be set up on the SEO menu under Template Library Maintenance.
F10=Customer Notes. This option is for notes concerning the customer pertaining to this order. This prints on the customer acknowledgement.
sF10=Order Totals. This option displays a window showing the A/P and A/R costs and totals for the order as entered. The window also displays any prepayments and the gross profit and gross profit margin.
F9=Other Options. This option displays a second options window.
F5=Cust Prepay/Deposit. This option enables the entry of a customer prepayment onto the order. The prepayment can be cash/check, credit card, or General Ledger.
F6=Customer Address Mod. This option allows the modification of the customer's address. Selection of F6 displays a window with the customer's address and the ability to change the address.
F7=Manual Commission Override. This option enables the overriding of the commission code or the entry of a second salesman for a split commission.
F8=Additional Instructions. This option enables the entry of additional instructions. Note: Some of our clients use this instruction window for multiple ship to addresses or multiple embroidery instructions. For example, if an order for a customer includes personalized jackets, the name to be embroidered and the color of the embroidery and jacket can be entered in this option as instructions to the vendor.
F9=Auto Letters to Print. This option enables a letter to print after the acknowledgement to the customer or after the purchase order to the vendor. Enter the sequence number for the letter to print from Text Editing in the space provided to the right of the selection.
F10=PO Ship To Address Mod. This option enables the modification of the ship to address on the purchase order. This is helpful with attached orders when the purchased shirt is to be embroidered prior to delivery to the customer. The Ship To Address on the primary order purchase order can be modified so that the shirt vendor will ship the shirts to the embroiderer rather than the customer. The Ship To Address on the attached order to the embroiderer remains as entered.
sF4=Tax & Terms (Cust). This option enables the tax authority code and/or the terms code to be changed on the fly in order entry. This change will effect the order only and will not change the customer setup.
sF5=Fax Purchase Order. This option is for UNIX/Linux users only. This option enables the faxing of the purchase order directly out of the system.
sF6=Fax Acknowledgement. This option is for UNIX/Linux users only. This option enables the faxing of the customer acknowledgement directly out of the system.
sF7=Packing Slip Instructions. This option enables the entry of instruction to the warehouse as to the packing requirements or requests of the customer. This option prints on the packing slip.
sF8=Imprint phrase/artwork. This option enables the entry of an imprint phrase that will print on the customer's invoice. This option must have additional setups on the SEO menu under Order Type Code Maintenance.
sF9=Order Printing. This option enables the printing of the five order form parts.
sF10=Fax Packing Slips. This option is for UNIX/Linux users only. This option enables the faxing of the packing slips to the warehouse. This is helpful if the warehouse and the office are in separate locations.
Date Fields
The EZZ system has features pertaining to the date fields that can save many keystrokes over time. These features pertain to any date field anywhere in the system.
| T | Enter a "T" on any date field and today's date will be imported. |
| W | Enter an uppercase "W" on any date field and the date will advance one week. |
| w | Enter a lowercase "w" on any date field and the date will move back one week. |
| + | Enter a "+" on any date field and the date will advance one day. |
| - | Enter a "-" on any date field and the date will move back one day. |
| C | Enter a "C" on any date field and the system will display a calendar. Use the page up and page down keys to advance or move back the calendar. Highlight the date needed and press enter and the date highlighted will import into the date field. |
Faxing Acknowledgement from Order Entry
Now, when you fax an acknowledgement from Order Entry or Maintenance, a line gets placed in the Order Note Pad that indicates that an acknowledgement has been posted.